Stud Welding

Designed for durability and structural integrity

Stud welding involves the same basic principles and metallurgical aspects as any other arc welding proce­dure. The weld gun lifts the stud a short distance from the base metal and initiates a controlled electric arc from the power source which melts the end of the stud and a portion of the base metal. The ceramic ferrule contains the molten metal into which the stud is thrust automatically and a high quality fusion weld is ac­complished where the weld is stronger than the stud itself.

Stud welding is generally used to weld larger diameter studs to thick base metals. Studs may be almost any shape and there are literally hundreds, however, they must have one end of the stud designed for Stud weld­ing and must be made of weldable materials. Mild steel, stainless steel and aluminium are applicable materials for stud welding.

HD-P Stud Welding Gun
1

Gun holds the fastener against the work surface

2

Trigger is squeezed and the stud is automatically lifted to form an arc

3

Ferrule on the fastener shields the arc and retains the molten metal
4

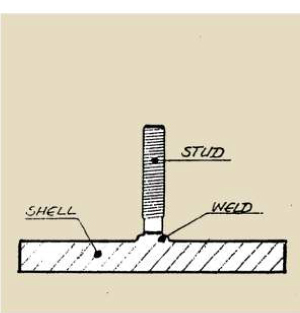
Under spring pressure the fastener is plunged into the molten metal to form a homogeneous weld

Visual Inspection and Testing

After proper set-up of the stud welding equipment for the particular anchor being welded, only infrequent inspection is necessary. Setting up should be done by welding the anchor on scrap metal or on the actual shell and adjusting the equipment so that the full weld fillet is obtained around the entire stud base. When the stud is hit with a light hammer, a good weld will produce a ringing sound similar to that obtained when the shell is struck. The test studs may be bent with the hammer about 30° from the vertical to further prove the weld quality. Additional test welds should be made each time welding is started, either at the beginning of the day or following a break for shift change or other reason.

Set Up

Approximate data for setting up the equipment is provided in various refractory anchor designs. To ensure that your job is set up properly and your personnel adequately trained, however, our representative is available to assist you if required.

  1. Protect all mild steel studs from rusting
  2. Ferrules should be kept dry
  3. The base material must be clean
  4. No stud welding should be done when there is rain, snow or frost on the base material or when the steel temperature is below 0°C
  5. Ground connections should always be made to clean metal and should be well tightened.
  6. All cable connections should be checked for tightness. Loose connections cause power drops and connector damage which may result in bad welds.
  1. Loose chuck. Does not grip stud tightly. (Replace) 
  2. Faulty or loose ground connection. (Repair or tighten)
  3. Poor surface condition of base material – excessive oil, grease, dust etc.
  4. Current and/ or time setting too low or too high (Adjust to diameter of stud)
  5. Broken or loose cables. (Repair)
  6. Dirt in gun. (Clean)
  7. Incorrect polarity (Cables hooked up incorrectly)
  8. Cables too closely coiled. (the full cable set provided must be used and strung out uncoiled)
  9. Arc blow is evidenced by ‘one sided’ welds. In severe cases there will be no fillet while the opposite side appears normal or excessively hot. the principle cause of arc blow is a magnetic field induced by the current flow during weld. It occurs most often on long, narrow strips of metal or near edges of sheets or plates. In some cases, a change in the rounding position or two grounds on the work piece will correct the problem, one at each end or edge of work.
  10. Incorrect plunge setting. (Adjust to correct setting)
  11. Incorrect lift setting. (Adjust to correct setting)
  12. Poor stud quality.
  13. Misalignment of accessories. (i.e. legs, foot piece, grip)

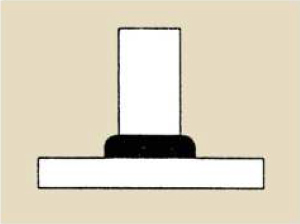
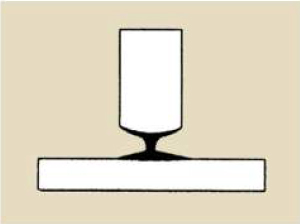
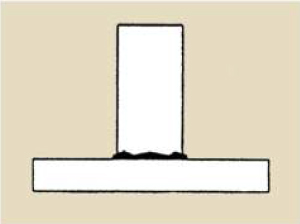
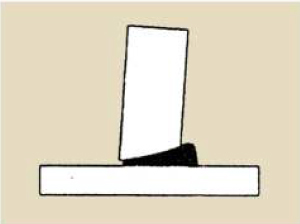
The visual inspection serves as a rough check for major defects. Illustrated below is an example of a good welded joint, followed by 3 examples of common problems.

  • Good welded joint. Optimum setting
  • Regular, bright and complete weld set up
  • Poor quality welded joint e.g. caused by excessive welding energy or insufficient plunge or lift

  • Stud is constricted at the welded joint. Stud is not completely welded all over the surface
  • Poor quality welded joint e.g. caused by insufficient welding energy or humid ceramic ferrules

  • Reduced and irregular weld upset
  • Poor quality welded joint e.g. caused by arc blow, tilted or unsteady welding position of welding gun

  • Stud flange is not completely welded and shows visual defects. Weld undercuts are visible.

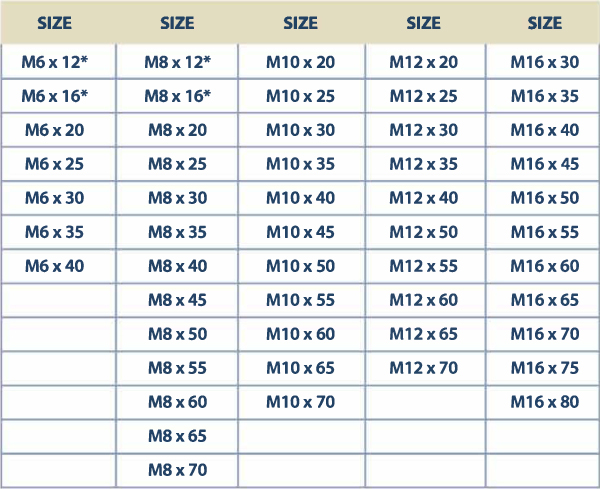
Please Note: Special lengths of Mild Steel Weld Studs available on request.

* Extension knock-off

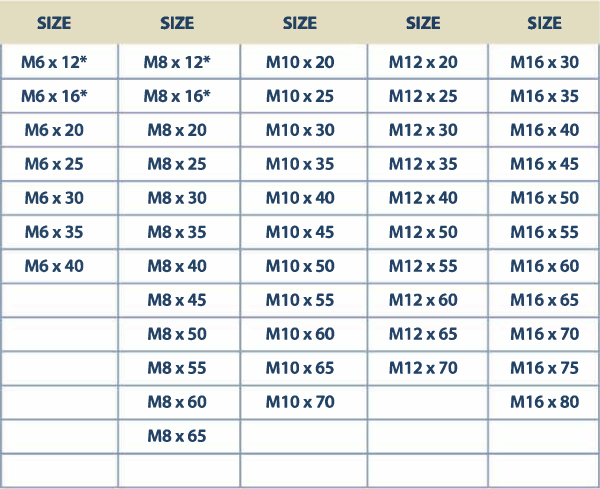
Please Note: Special lengths of Stainless Steel 304 Weld Studs available on request.

Please Note: Ceramic ferrules for stud welding are available for all the studs shown above.

Ready to specify your anchors or weld studs?

Oster combines engineering precision, flexible solutions, and technical expertise to deliver refractory anchors and weld studs that meet the highest industry standards.

Contact our team today to discuss your project requirements.

Scroll to Top